

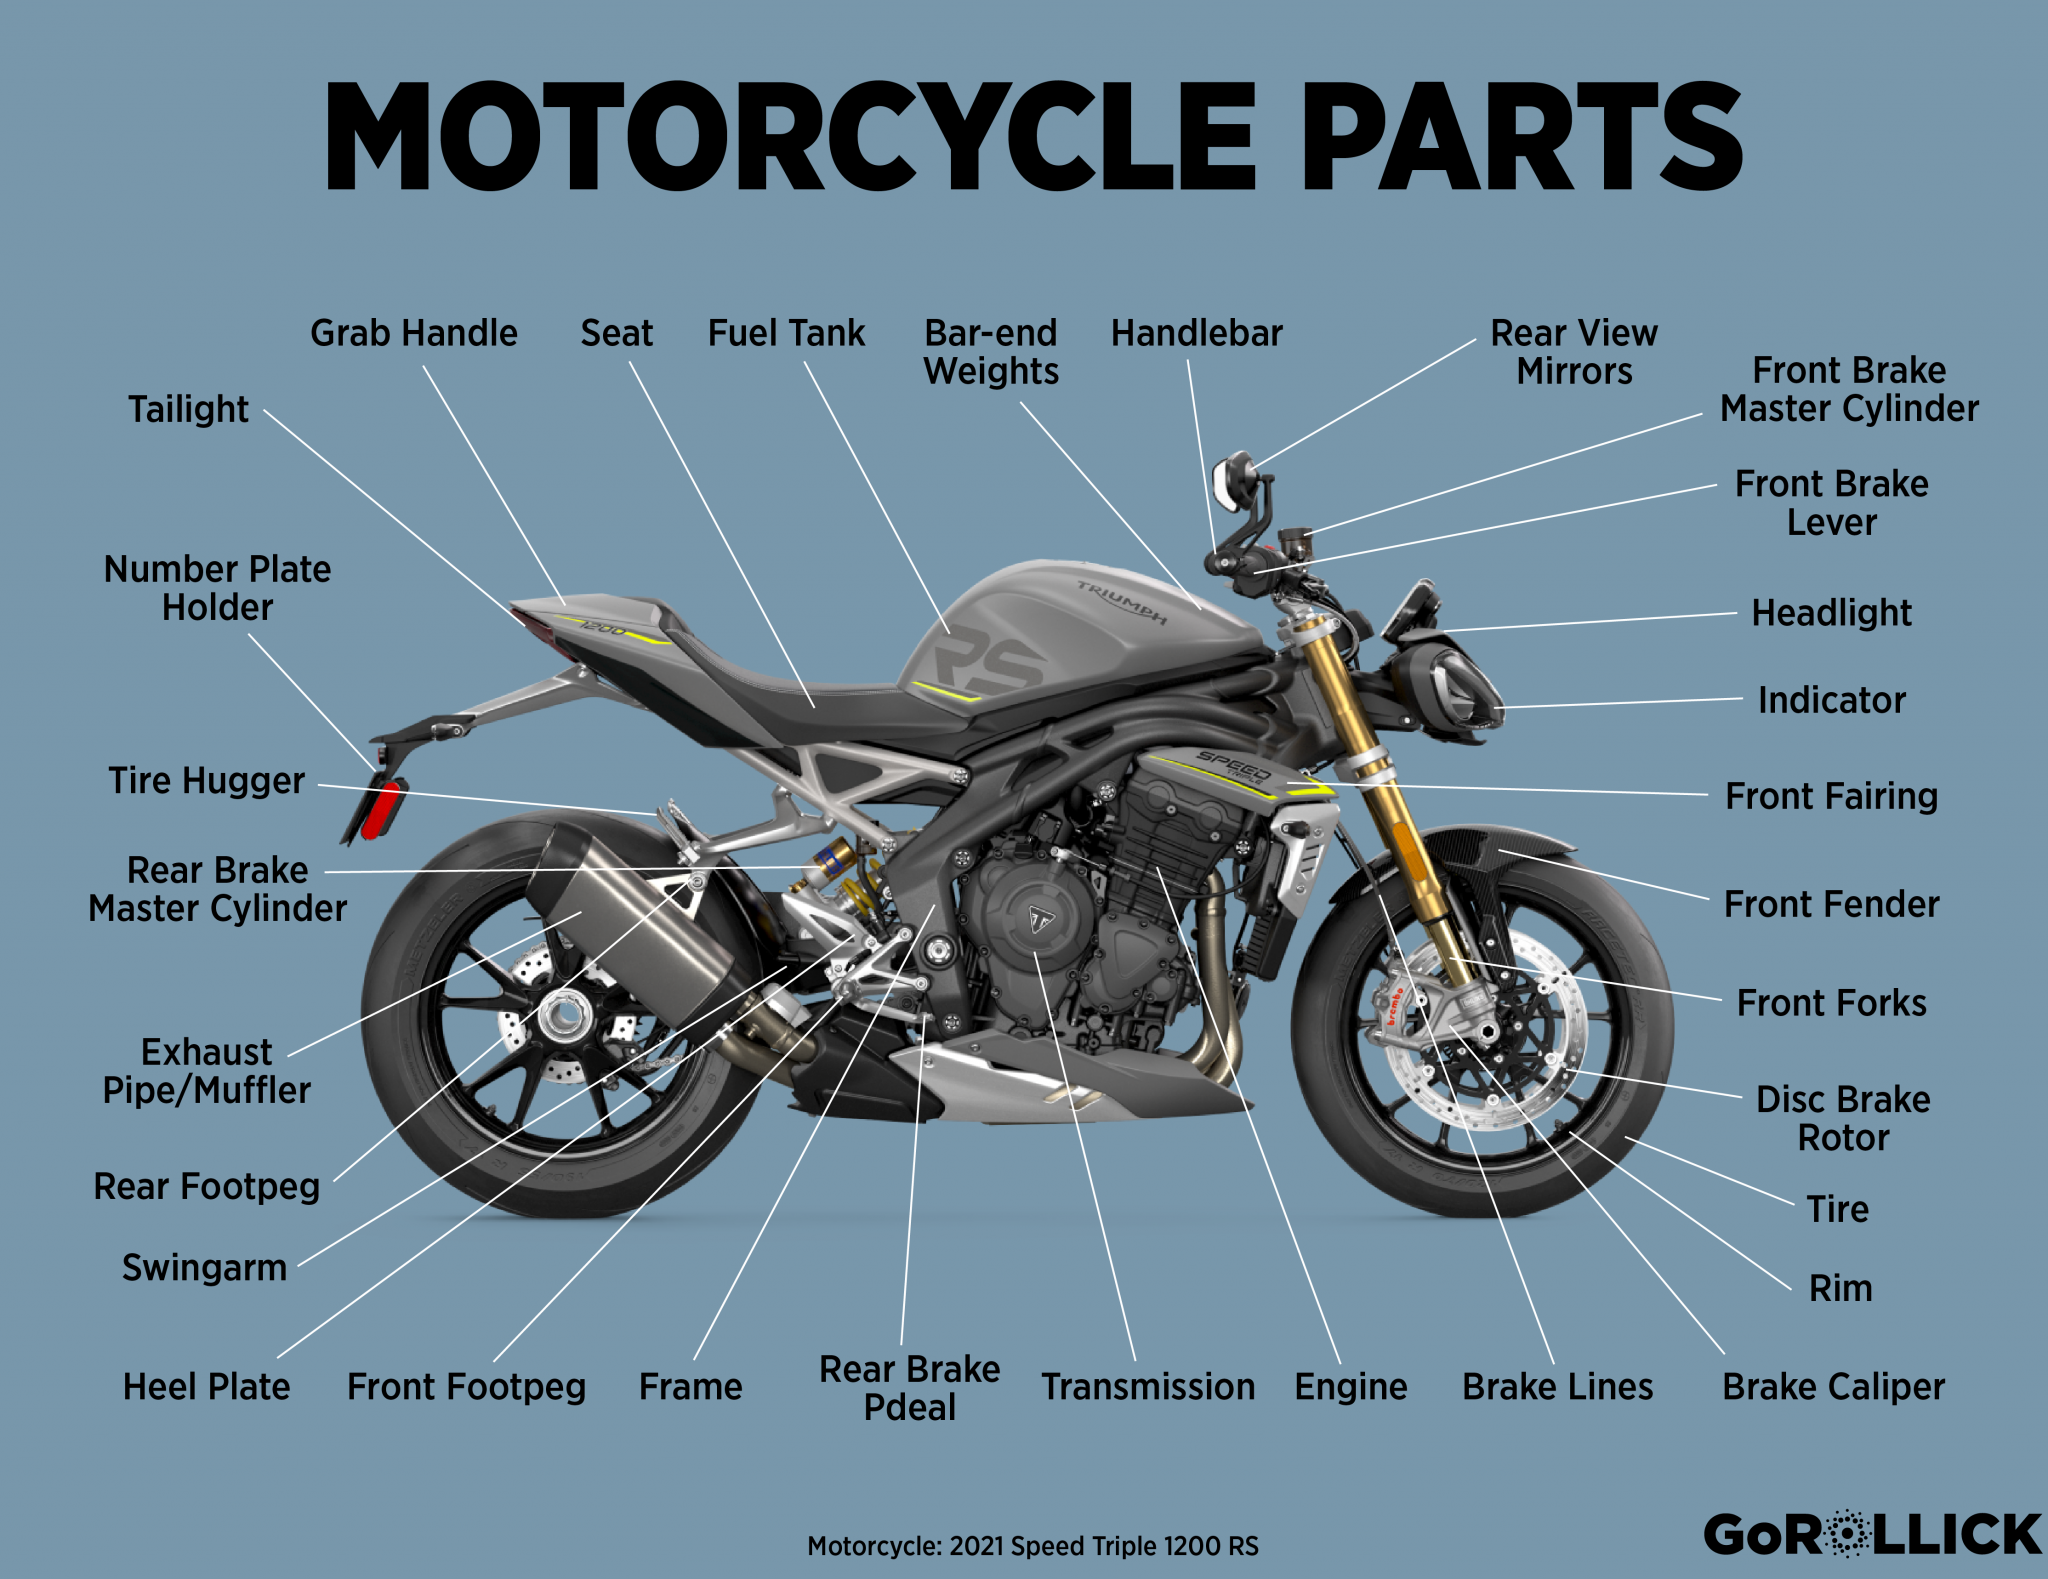
I. The Colorful World of Motorcycle Parts
(I) Chain Tensioner
- Structural Principle
- Mechanical Structure: A chain tensioner usually consists of components such as a tensioner pulley, spring, and housing. The tensioner pulley is generally made of wear-resistant rubber or metal. Rubber tensioner pulleys are relatively soft and can effectively reduce operating noise. Their Shore hardness is between 50 – 70A. Metal tensioner pulleys have higher wear resistance and strength and are mostly made of aluminum alloy or steel. The spring provides tension inside. Commonly, the spring material is spring steel. Its elastic coefficient is between 20N/mm – 50N/mm. The appropriate elastic coefficient is selected according to the power of the motorcycle and the chain specification. The housing plays the role of protecting and fixing the internal parts and is generally made of aluminum alloy or high-strength plastic. Aluminum alloy housings have good heat dissipation and sturdiness.
- Working Method: When the motorcycle is running, the chain moves with the power output of the engine. During operation, it may become loose due to wear and other reasons. Under the action of the spring, the tensioner pulley of the chain tensioner automatically applies a certain pressure to the chain to keep it at an appropriate tension, avoiding chain jumping, falling off, or generating abnormal noise.
- Maintenance Methods
- Regular Inspection: After every 3000 – 5000 kilometers of riding, check whether the appearance of the chain tensioner is damaged, such as a cracked housing or worn tensioner pulley. When the wear depth of the tensioner pulley exceeds 2mm, consider replacing it with a new one. Check whether the elasticity of the spring is normal. This can be judged by pressing the tensioner pulley and observing its rebound. If the spring rebounds slowly or cannot return to its original position, the spring may need to be replaced.
- Cleaning and Lubrication: Use a soft brush to remove dust and impurities on the surface of the chain tensioner once every six months. For internal movable parts, a few drops of lightweight lubricating oil, such as sewing machine oil, can be dripped. The amount of lubricating oil is about 2 – 3 drops to ensure the smooth operation of the parts. But be careful to avoid dripping lubricating oil on the chain to prevent it from attracting dust and affecting the chain’s lifespan.
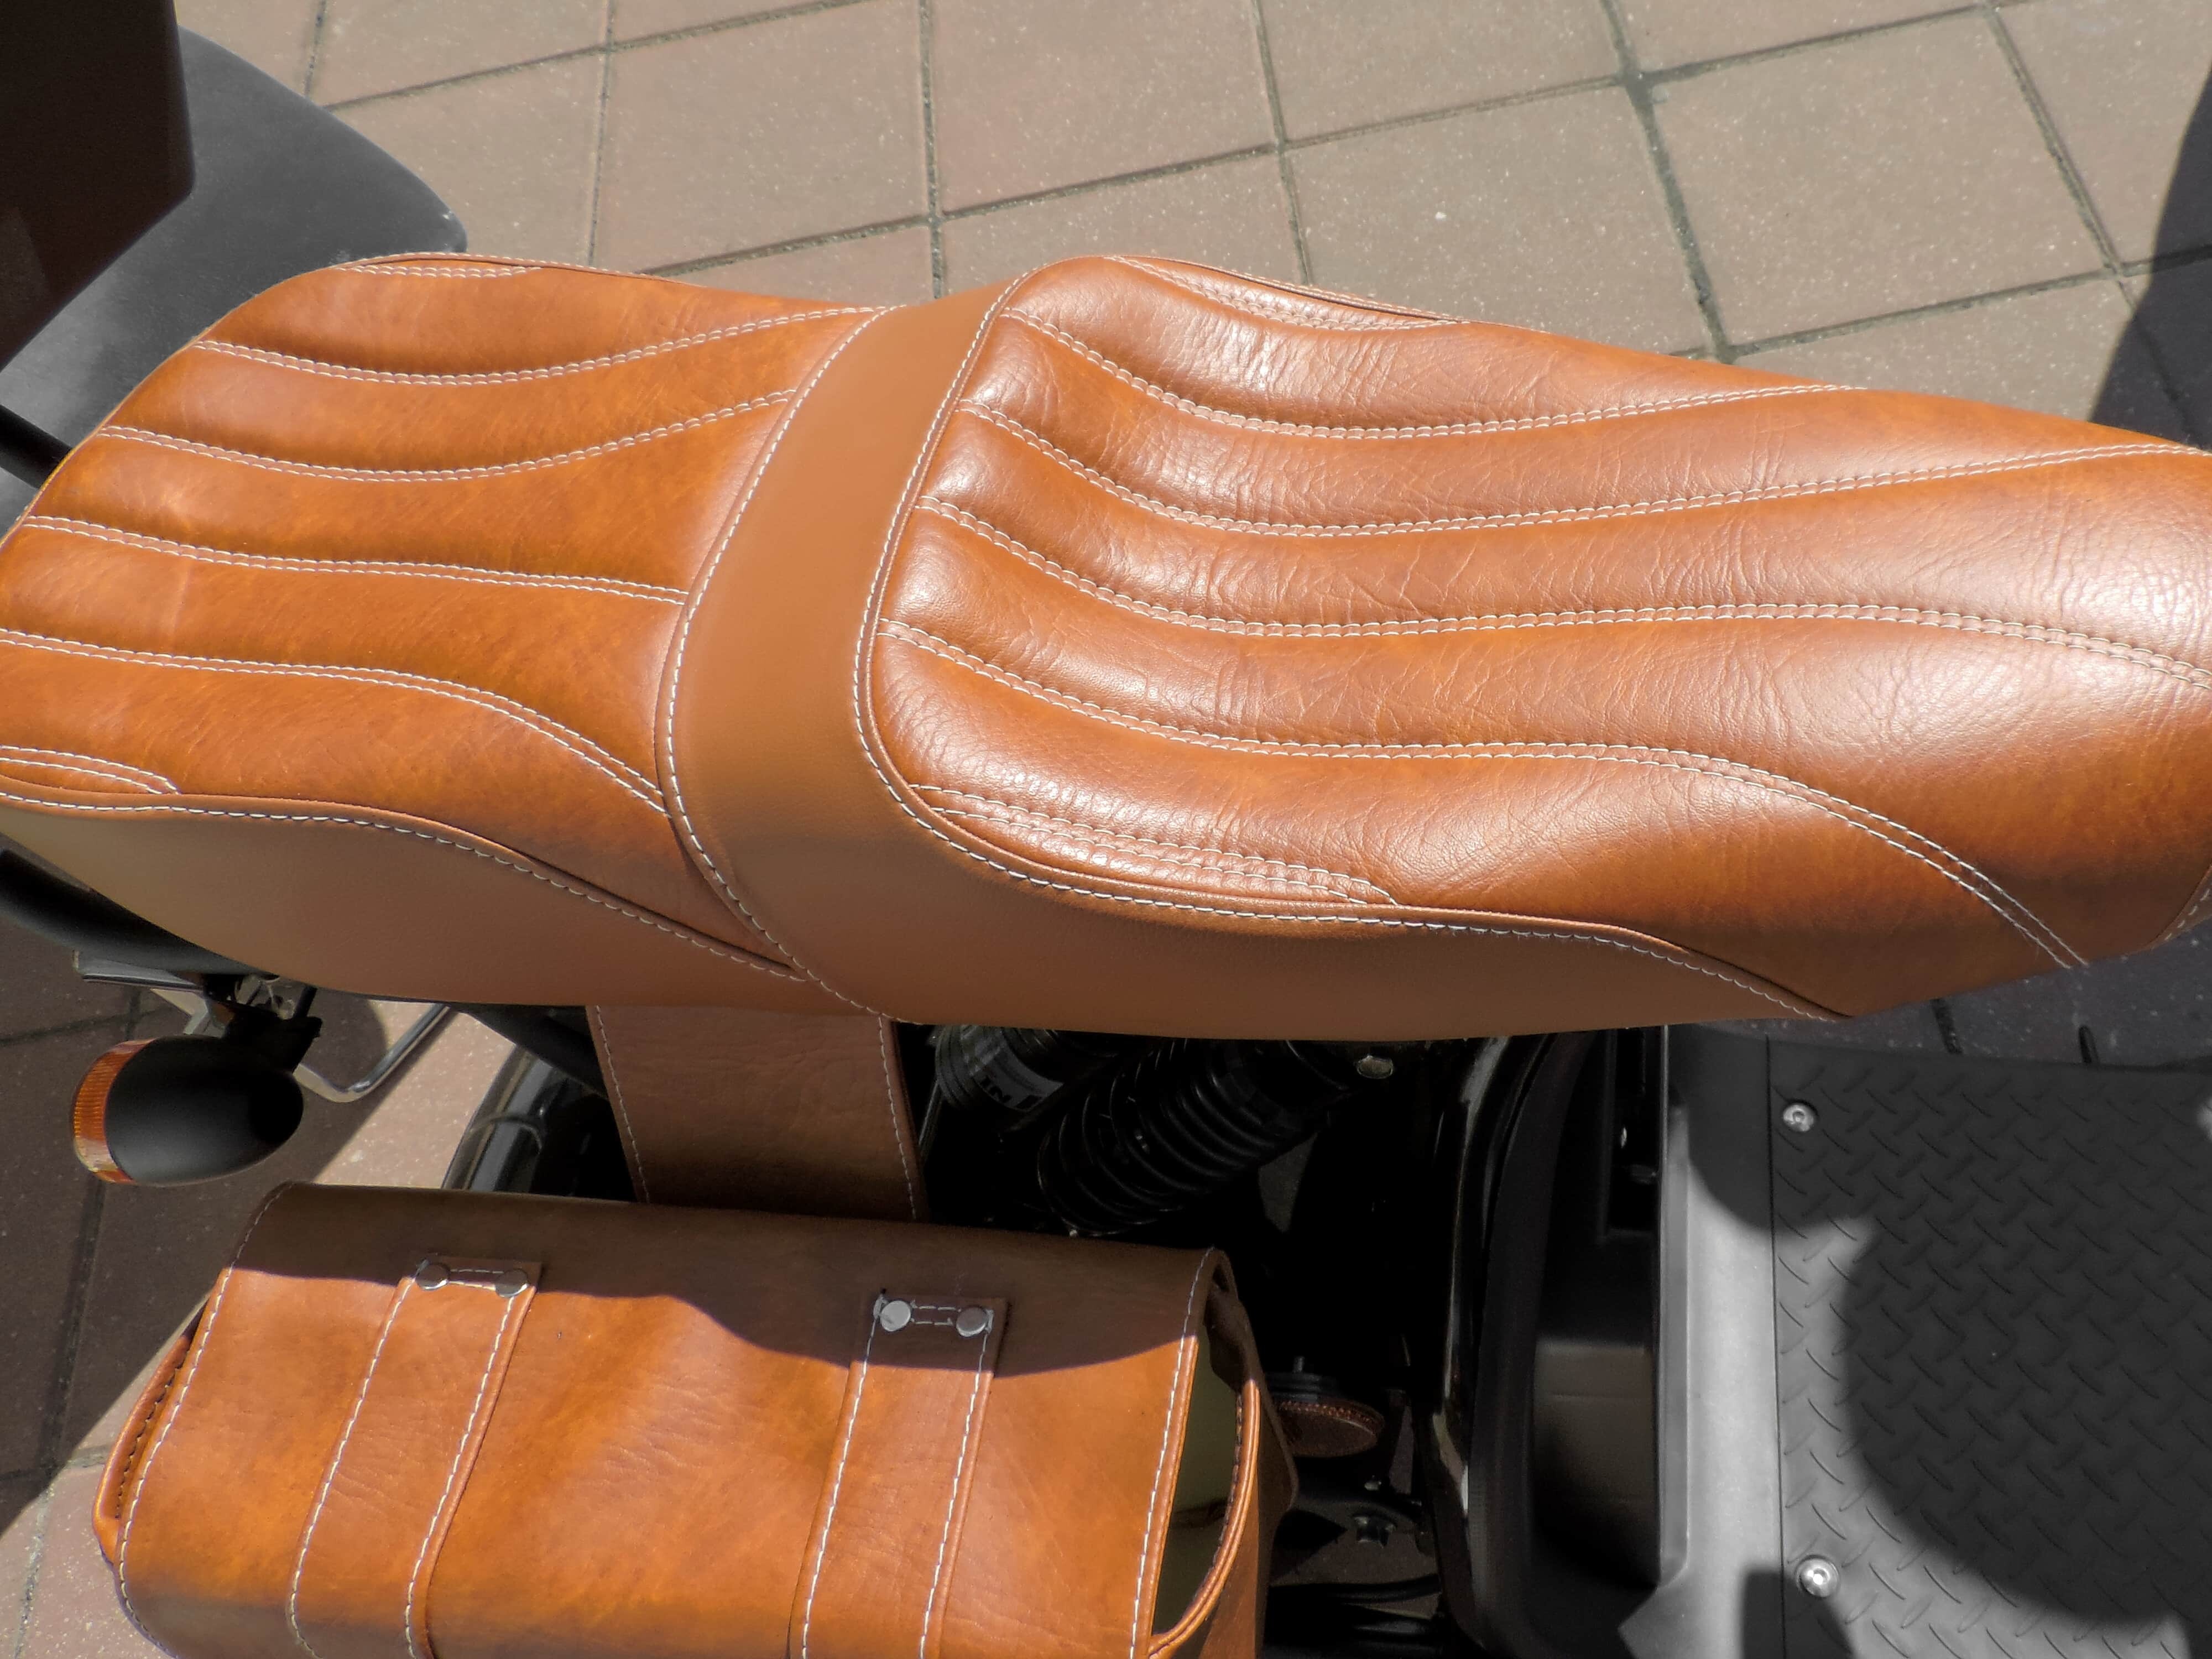
(II) Seat
- Structural Principle
- Material Composition: The outer skin of a motorcycle seat is usually made of leather or artificial leather, which has certain water resistance and wear resistance. The internal filling materials include sponge, gel, etc. The density of sponge is generally between 30 – 50kg/m³. The higher the density, the better the support but it is also relatively harder. Gel seats can better distribute pressure and provide a more comfortable riding experience, but they are more expensive. The bottom plate of the seat is generally made of plastic or metal and plays the role of supporting and fixing.
- Design Features: The shape and design of the seat vary according to the type and purpose of the motorcycle. The seat of a sport motorcycle is usually narrow and lower in the front and higher in the back to facilitate the rider to better control the vehicle during riding. The seat of a cruising motorcycle is wider and more comfortable, suitable for long-distance riding. The texture and pattern on the surface of the seat are not only for aesthetics but also have a certain anti-slip effect.
- Maintenance Methods
- Daily Cleaning: Wipe the surface of the seat with a damp cloth at least once a week to remove dust and stains. For leather seats, a special leather cleaner can be used for deep cleaning every two months. The amount of cleaner used depends on the seat area and is generally 20 – 30ml. After cleaning, dry it with a dry cloth to avoid water residue causing leather aging or mildew.
- Protective Maintenance: When the sun is strong, try to avoid exposing the motorcycle to the seat for a long time to prevent leather from fading and aging. A seat cover can be used for protection. Choose a seat cover of the appropriate size. The material is preferably Oxford cloth that is waterproof and sunscreen. If the seat is damaged, small scratches can be repaired with leather repair paste. The application thickness of the repair paste is about 1 – 2mm. After drying, sand it flat.
(III) Rearview Mirror
- Structural Principle
- Lens Part: Rearview mirror lenses are divided into flat mirrors and convex mirrors. Flat mirrors can provide a real image, but the field of view is relatively narrow. Convex mirrors have a wide field of view and can observe a larger range of the rear situation, but the image will be deformed to a certain extent. The lens material is generally tempered glass or acrylic. Tempered glass lenses have high hardness and clarity but are relatively heavier. Acrylic lenses are lighter and less likely to break, but their wear resistance is slightly worse. The radius of curvature of the lens is between 800mm – 2000mm. Different curvatures affect the field of view.
- Adjustment Mechanism: The adjustment mechanism usually consists of a ball joint, fastening screws, etc. The ball joint can achieve flexible adjustment at multiple angles. The fastening screws are used to fix the adjusted angle. The screws are generally made of stainless steel or high-strength alloy, and the diameter is between 4mm – 6mm.
- Maintenance Methods
- Cleaning and Maintenance: After every 500 kilometers or so of riding, use a clean soft cloth to wipe the rearview mirror lens to remove dust, water stains, and insect remains. If there is oil stain on the lens, a small amount of glass cleaner can be used. Spray about 2 – 3 times and then gently wipe it clean with a soft cloth. Check whether the adjustment mechanism is flexible. If there is a stuck phenomenon, a drop of lubricating oil can be dripped at the ball joint. Light mechanical oil can be selected as the lubricating oil.
- Calibration and Adjustment: Regularly check whether the angle of the rearview mirror is correct, generally once every two months. When adjusting, ensure that the road conditions on both sides at least 100 meters behind can be clearly seen. After adjusting the angle, the torque of the fastening screws should be controlled at 3 – 5N·m to avoid the lens shaking or difficulty in adjustment due to being too loose or too tight.
(IV) Fuel Tank Cap
- Structural Principle
- Sealing Structure: The fuel tank cap usually contains a sealing ring, lock core, and cap body. The sealing ring is generally made of rubber, such as nitrile rubber, which has good oil resistance and sealing performance. The thickness of the sealing ring is between 2mm – 4mm, and its hardness is between Shore A 50 – 70 degrees, which can effectively prevent gasoline from evaporating and leaking. The lock core part adopts a mechanical lock or electronic lock structure. The mechanical lock core is opened by matching the tooth shape of the key, and the electronic lock core controls the opening by sensing chips or password input.
- Ventilation Design: To ensure pressure balance in the fuel tank, the fuel tank cap usually has ventilation holes or ventilation valves. The diameter of the ventilation hole is generally between 1mm – 3mm. The ventilation valve automatically adjusts the opening and closing according to the pressure change in the fuel tank to ensure that the fuel tank can supply fuel normally under different altitudes and temperatures.
- Maintenance Methods
- Cleaning and Inspection: After every 1000 kilometers or so of riding, check whether there are stains and corrosion marks on the surface of the fuel tank cap. Gently wipe the surface with a damp cloth to remove dust and oil stains. Regularly check the integrity and elasticity of the sealing ring. If the sealing ring is found to be aged, cracked, or hardened, it should be replaced in time. When replacing the sealing ring, ensure that it is installed in the correct position without distortion or deformation.
- Lock Maintenance: For mechanical lock cores, regularly drip a small amount of lock core lubricant, such as graphite powder or special lock lubricating oil, into the lock hole. The amount of lubricating oil is about 0.5 – 1ml to keep the lock core rotating smoothly. For electronic lock cores, pay attention to keeping it clean and avoid water ingress and moisture. If the battery power is insufficient, the battery should be replaced in time. Generally, the battery life is about 1 – 2 years.
(V) Footrest
- Structural Principle
- Material and Structure: The main body of the footrest is generally made of aluminum alloy or steel. Aluminum alloy footrests are lightweight, high-strength, and have good corrosion resistance. They are often used on high-performance motorcycles. Steel footrests are more sturdy and durable and have a relatively lower cost. The surface of the footrest usually has anti-slip textures or rubber pads to increase the friction between the foot and the pedal. The thickness of the rubber pad is between 3mm – 6mm, and its friction coefficient is between 0.6 – 0.9.
- Installation Method: The footrest is connected to the frame by bolts. The strength grade of the bolts is generally between 8.8 – 12.9. To reduce vibration transmission, some footrests are also equipped with shock-absorbing rubber sleeves or shock-absorbing springs. The Shore hardness of the shock-absorbing rubber sleeve is between 40 – 60A, and the elastic coefficient of the shock-absorbing spring is between 10N/mm – 30N/mm.
- Maintenance Methods
- Daily Cleaning: After each ride, wipe the surface of the footrest with a clean cloth to remove dirt and debris. Conduct deep cleaning of the footrest once every two months. Mild detergent and a brush can be used to remove stubborn stains. Check the wear condition of the anti-slip texture or rubber pad. If the wear is serious and affects the anti-slip effect, the rubber pad should be replaced in time.
- Tightening Inspection: After every 2000 kilometers of riding, check whether the bolts of the footrest are loose. Use a torque wrench to tighten according to the specified torque value. Generally, the bolt torque is between 20N·m – 40N·m. At the same time, check whether the shock-absorbing components are working properly. If there is damage, it should be replaced in time.
II. The Profound Significance of Motorcycle Parts Maintenance
(I) Safety Assurance
Although these parts have different functions, they all have an important impact on riding safety. A clear rearview mirror can help riders observe the road conditions and respond in time. Stable footrests can ensure good support for the feet and avoid slipping during operation. A well-sealed fuel tank cap can prevent gasoline leakage and reduce the risk of fire. A comfortable and safe seat can allow riders to maintain a good driving posture and reduce the potential for accidents caused by fatigue.
(II) Extended Service Life
Through scientific and reasonable maintenance measures, the service life of parts can be effectively extended, reducing maintenance and replacement costs. Regular cleaning, inspection, and maintenance can timely discover potential problems. For example, replacing aged sealing rings and repairing worn footrest surfaces in time can keep the parts in good working condition all the time.
(III) Enhanced Riding Experience
High-quality parts and careful maintenance can make riding more comfortable and enjoyable. A comfortable seat can reduce fatigue during long-distance rides. A clear and unobstructed rearview mirror provides a good field of view. Stable footrests and a proper operating feel enhance the riding’s controllability. These all help to improve the overall riding experience and allow motorcycle enthusiasts to better enjoy the fun of riding.
In conclusion, the maintenance of motorcycle parts is a task that cannot be ignored. Whether it is common or niche parts, they all deserve our careful care. Let us use scientific maintenance methods to keep motorcycles in good performance and accompany us on every wonderful riding journey.